

Products:
News Updater
- Download
- Register
- Updates
- Documentation:
-- Dev. Tutorial
-- Dev. Example
-- User Manual
Freeware:
DirToTxt

In this tutorial we will explain how to create a news page which can be updated using the News Updater program.
The tutorial consists of 7 steps:
Lazy developers might want to download this template file which implements steps 1 through 4. After opening the file go to the menu "Site" and select the option "Edit Template/Settings". The tabs for template and settings will then appear (no password required).
Create HTML layout, look and feel
Use your favourite HTML editor to create the layout and look of your page. Fill in some "dummy" data where the index, header, date and body of the articles must come. There is one thing you must remember while creating your template, that is the order in which several parts of the page occur. The HTML must have these parts in the same order. The order is as follows:
All the HTML before, between and after these elements has to be inserted by you. Here follows a simple example of a news page without an index.
| <html> <head> <title>News Updater Demo</title> </head> <body bgcolor="#ffffff"> <h1 align="center">News</h1> <h2>Header</h2> <p><b>Date</b></p> <p>Body of the article</p> </body> </html> | In your browser it will look like this: |
Create HTML Template
Now we have the layout and look of the page we can enter it into a news updater template. Put a copy of the News Updater program in an empty directory and start it. If you are not registered you have to go to the menu "File" and choose "New". Registered users don't need to do this because the Template and settings tab's will already be visible.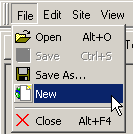
Then go to the Template tab-page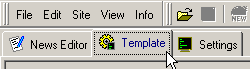
Cut each section out of your HTML code and insert it into the right place. In our example it would be as follows: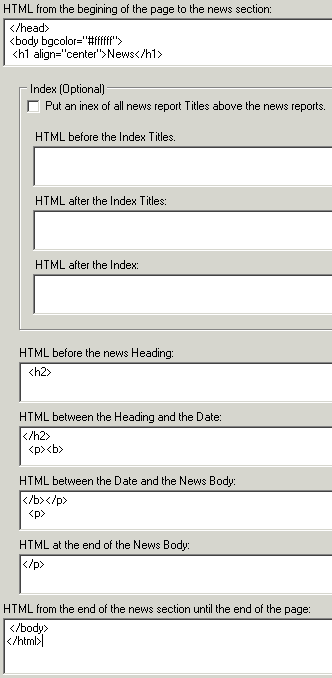
For a better illustration, here is a colored version of our example:
| <html> <head> <title>News Updater Demo</title> </head> <body bgcolor="#ffffff"> <h1 align="center">News</h1> <h2>Header</h2> <p><b>Date</b></p> <p>Body of the article</p> </body> </html> | From the beginning of the page to the news section Before the news heading Between the heading and the date Between the date and the news body At the end of the news body From the end of the news section until the end of the page |
The yellow parts are not repeated with every article.
Fill in filenames and target directory
Go to the settings tab.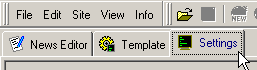
Fill in the filename that the program should generate for your News page.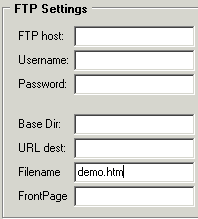
If the file should be in another directory than your "home" directory (on the FTP server), fill in the path relative to the home directory, or fill in the Base Dir field.
Test and debug
Go to the News Editor Tab and add a few articles to test your template.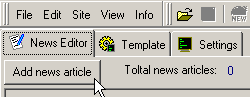
Type in some text and give the articles headers. Then klik on the Preview button.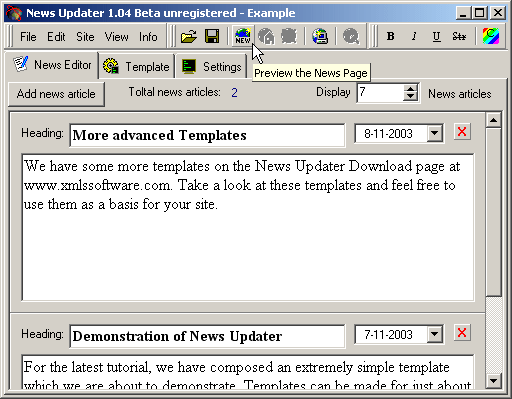
If the template was filled in correctly, News Updater should generate a page that looks like this: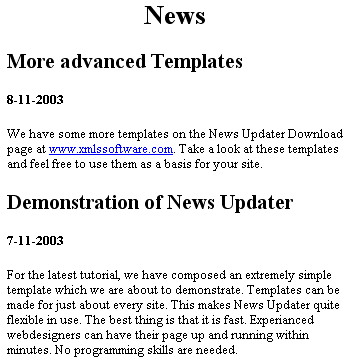
Fill in the FTP data
Go to the settings tab and fill in your Login Name, Password, the FTP Hostname and the Base directory where your files should be stored (relative to your home (~) directory).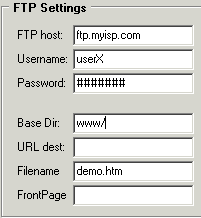
Now press the "![]() " button to upload the page to your site.
" button to upload the page to your site.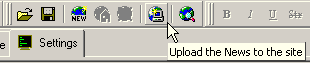
Finishing touches
To be able to quickly check if the page was uploaded correctly, Fill in the "URL Dest" field at the FTP settings. This will enable the "![]() " button, which is nothing less (or more) than a link to the URL you fill in.
" button, which is nothing less (or more) than a link to the URL you fill in.![]()
If you are making a site for someone else, you might want to protect the settings and template so it can't be "accidently" messed up. Unregistered users can do so by filling in a password at the bottom of the HTML template Tab-page. Registered users don't have to do anything.![]()
Registered users can customize the about box, put a link to their site and E-mail address, show their logo, etc.
Deploy to the end user
After copying any images (background and buttons) to the "WorkDir" directory, it is advisable to use an archiving utility such as WinZip or WinRar to pack the files together. A full blown installation program like Wise Solutions or InstallShield Express could also be used, but they might be an overkill for this cause. In any case, the package should contain the following:
It is a good idea to install these files to the "Program files\NewsUpdater" directory. For new versions of News Updater we will have an installation file which will install the new version to that directory. If you have installed it to the right directory you can render your customers the installation file without having to make one yourself.
Registered users don't need to include their logo in a seperate file since it is stored inside the WSU file. The BAK file can also be left out (it is a backup file which is made whenever you press the "Save" button).
If you are a registered user and want to be able to make changes on-site at your client (on an unregistered PC), there is a "secret" way to do so. Click the last image above to find out how (with javascript turned on).
The files can also be stored on a floppy or a USB memory stick, so the user can update his site from any computer with an internet connection (as long as the FTP ports are open).
Version 1.08 had a backup option to store the WSU file on the server. Version 1.09 uses this feature to enable deployment on CD-Roms. V1.09 no longer stores the preview files on disk, but serves them directly to the browser with an internal webserver. With the "Auto Synchronize" feature, the original backup feature becomes the main storage solution, and local storage is only done for backup reasons. This approach allows multiple users to update the site from different locations (to a limited extent though, they cannot edit the site at the same time because the last file uploaded will overwrite the previous one).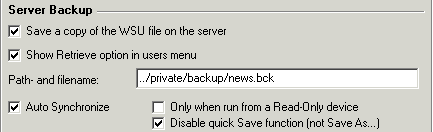
Auto Synchronize in this case means to always download the last uploaded version from the site when the program is started (it does not check whether the local version is newer).
When using the auto synchronize option, the local WSU file (the one which can be put on a cd) may differ from the online one. The local version does not need the template data or any articles, so it can remain a small file. When the online "backup" version is downloaded it will override all settings, template and content of the local version. To prevent the auto synchronize function from executing when loading your WSU file (when you want to edit the local file instead of the remote one), hold the Shift or Ctrl button down while opening the file.
You may also choose only to "Auto Synchronize" when the program is run from a Read-Only device such as a CD-Rom. In this case check the checkbox "Only when run from a Read-Only device". To prevent the end-user from overwriting news on his/her site by not synchronizing, you may choose to disable the quicksave button. This could for example prevent the user from saving the file locally, and later forget to synchronize after someone else made changes. It does not disable the "Save As" (or "Make Backup") functions. When running from a CD-Rom the quicksave function will be disabled automatically since trying to overwrite the file on CD would cause an error.
Take a look at the example template which illustrates how to use the Index feature and how the date on the front page can be changed with every update. In the Download section we will have some more files shortly. Please examine these files, and feel free to use them as a base for your news pages.